
Custom Inspection Schedules: Tailoring EICRs to Your Inspections
Not every electrical inspection is the same. A domestic property inspection differs from a commercial premises inspection. A small flat needs different schedule items than a large house with outbuildings. Pirform’s Schedule Manager gives you complete control to create customised inspection schedules that match your exact inspection requirements.
Why Custom Schedules Matter
The standard BS 7671 inspection schedule is comprehensive, but it includes items that may not apply to every installation you inspect. Custom schedules let you:
- Remove irrelevant items - Skip items that don’t apply to the installation type
- Add specific items - Include checks relevant to particular installations or client requirements
- Create inspection templates - Build reusable schedules for common scenarios
- Improve efficiency - Focus on what matters for each inspection
- Maintain consistency - Use standardised schedules across your team
For example, you might create separate schedules for:
- Domestic properties under 100A
- Commercial premises with three-phase supplies
- Industrial installations with motor circuits
- New build initial verifications
- Periodic inspections with a limited scope
What You Can Do with the Schedule Manager
Pirform’s Schedule Manager is a comprehensive tool for managing inspection schedules. You can:
Create and Manage Schedule Libraries
- Save custom schedules - Build your library of reusable schedules
- Pick relevant schedules - Select the right schedule for each EICR
- Export schedules to files - Share custom schedules with other engineers
- Import schedules - Add schedules created by colleagues
Customise Schedule Content
- Add schedule items or sections - Include items from your library
- Edit existing items - Modify item descriptions to match your needs
- Remove unnecessary items - Delete items that don’t apply
- Reorder items and sections - Organise the schedule logically
Navigate and Search
- Search for items - Find specific items in your library or current schedule
- View in different modes - See schedules summarised by sections or fully detailed
- Toggle expanded/collapsed - Focus on sections of interest
Built-In Schedules
Pirform includes several pre-configured schedules to get you started:
Standard Schedules
- Condition report inspection schedule - For residential and similar premises with supplies up to 100A
- Example checklist for initial verification - From BS 7671+A2 page 515
- Example items requiring inspection - From BS 7671+A2 page 523
These built-in schedules provide a solid foundation. You can use them as-is or customise them to create your own variations.
Working with the Schedule Manager
Opening the Schedule Manager
Click Schedule Manager in the ribbon when working on an EICR. The Schedule Manager opens with two panels:
- Left panel - Your schedule library (saved schedules)
- Right panel - Current certificate’s schedule (what will print)
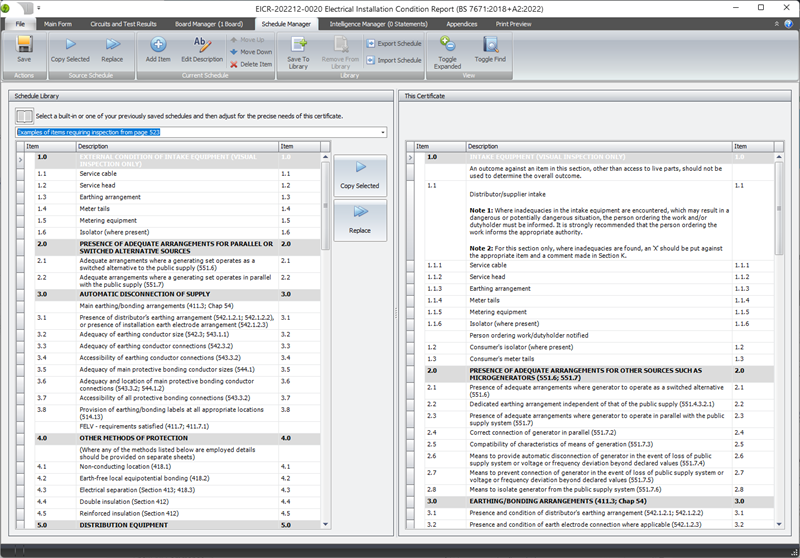
Selecting a Schedule from Your Library
Use the dropdown at the top left to select any schedule from your library. This shows you the schedule’s contents without changing your current certificate.

Copying Items Into Your Schedule
To add specific items from your library into the current certificate:
- Select the item or section in the left panel (library)
- Click Copy Selected in the middle buttons
- The item or section appears in your current schedule on the right
This is perfect when you want to add a few items to an existing schedule without replacing everything.
Replacing the Entire Schedule
To replace your current inspection schedule completely:
- Select the schedule you want from the library (left panel)
- Click Replace in the middle buttons
- Your certificate’s schedule is replaced with the selected one
This is ideal when starting a new EICR and you want to use a specific schedule template.
Customising Schedule Items
Adding New Items
To create a new schedule item:
- Select the section where you want to add the item
- Click Add Item in the ribbon
- Enter the item description
- The item appears in that section
Editing Item Descriptions
To modify an existing item:
- Select the item in your current schedule (right panel)
- Click Edit Description (or double-click the item)
- Change the text as needed
- Click OK to save

This is useful when you need to adjust wording to match specific installation characteristics or client terminology.
Removing Items
To delete unnecessary items:
- Select the item or section in your current schedule
- Click Delete Item
- The item is removed from the schedule

Items removed from your current certificate’s schedule remain in your library schedules for future use.
Organising Your Schedule
Moving Items and Sections
Use Move Up and Move Down buttons to reorder items or sections in your current schedule.

This lets you organise items logically—for example, grouping all earthing items together or ordering items to match your inspection workflow.
Collapsing and Expanding Sections
Click Toggle Expanded in the ribbon to collapse all sections, showing just section headers. Click again to expand all sections.
You can also right-click individual sections to collapse or expand them separately.

Saving Schedules to Your Library
Once you’ve customised a schedule, save it to your library for future use:
- Click Save To Library in the ribbon
- Enter a descriptive name (e.g., “Domestic under 100A - Standard”)
- Optionally add a description explaining when to use this schedule
- Click Save

The schedule becomes available in the library dropdown for all future EICRs.
Naming Best Practices
Use clear, descriptive names that indicate:
- Installation type (domestic, commercial, industrial)
- Size or complexity (under 100A, three-phase, etc.)
- Purpose (periodic inspection, initial verification)
Examples:
- “Domestic Flat - Basic Inspection”
- “Commercial Office - Full Schedule”
- “Industrial with Motors - Initial Verification”
- “Rental Property - Landlord EICR”
Searching for Items
When working with large schedules, use the search feature:
- Click Toggle Find in the ribbon
- Enter search terms in the find boxes
- Matching items are highlighted in both panels

This is particularly useful when you want to quickly locate specific items like “RCD” or “bonding” across large schedules.
Sharing Schedules with Other Engineers
Exporting Schedules
To share a custom schedule with colleagues:
- Select the schedule in the library dropdown
- Click Export Schedule in the ribbon
- Confirm the schedule name and optional description
- Choose where to save the file
- Send the file to your colleague

Importing Schedules
To add a schedule someone shared with you:
- Click Import Schedule in the ribbon
- Select the schedule file they sent
- The schedule appears in your library dropdown
This makes it easy to standardize inspection schedules across teams or share specialized schedules for particular installation types.
Working with the Inspection Schedule
Automatic Observations and Limitations
When you code a schedule item with C1, C2, C3, or FI, Pirform automatically creates an associated observation. The observation is linked to that schedule item.

Similarly, coding an item as LIM automatically adds a limitation.

Changing the coding to a different value removes the observation or limitation—Pirform keeps everything synchronized automatically.
Using the Inspection Schedule Manager
The Inspection Schedule Manager (different from the Schedule Manager) helps you quickly enter values across multiple schedule items:
- Click Inspection Schedule Manager in the ribbon
- Select sections to update
- Choose whether to update only blanks or all items
- Select the value to apply (PASS, N/A, etc.)
- Click Done

This is perfect for marking large groups of items as PASS or N/A quickly after inspecting different areas of an installation.
Set All Blanks to Pass
Use the Set All Blanks To Pass button at the lower left to mark all blank items as PASS in one action. This is useful when most items passed and you only need to code the exceptions.
Excluding Not Applicable Items from PDFs
You can choose to hide schedule items marked as N/A from printed certificates:
- Go to Certificate Options
- Enable the option to exclude N/A schedule items
- The PDF shows only applicable items with a note explaining the exclusion
This creates cleaner, more focused reports for clients while maintaining complete records in Pirform.
Common Scenarios
Scenario 1: Creating a Template for Rental Properties
You regularly inspect rental properties and want a streamlined schedule:
- Start with “Condition report inspection schedule”
- Remove items that rarely apply to rental properties
- Add specific items that your letting agent clients require
- Save as “Rental Property - Standard EICR”
- Use this template for all rental inspections
Scenario 2: Commercial Premises with Three-Phase
A commercial client needs regular inspections:
- Start with a standard schedule
- Add items specific to three-phase installations
- Add items for emergency lighting and fire alarm interconnections
- Include checks for business-critical circuits
- Save as “Commercial - Three Phase Template”
- Export and share with colleagues who inspect this client’s other locations
Scenario 3: Limited Scope Periodic Inspection
A client requests inspection of specific areas only:
- Start with a standard schedule
- Remove all sections not relevant to the agreed scope
- Add a note item in each section explaining the limitation
- Save as “Limited Scope - [Client Name] Template”
- Use for all inspections under this agreement
Scenario 4: New Build Initial Verification
Initial verifications need a different focus than periodic inspections:
- Use the “Example checklist for initial verification” schedule
- Add items specific to your quality checks
- Remove items that don’t apply to new installations
- Save as “Initial Verification - New Build”
- Keep it updated as building regulations change
Tips for Effective Schedule Management
Start with Built-In Schedules
Don’t create schedules from scratch. Start with one of Pirform’s built-in schedules and modify it. This ensures you don’t miss important items.
Create General Templates First
Build broad templates (domestic, commercial, industrial) before creating highly specific ones. You can always customise a general template for unique situations.
Review Schedules Periodically
As regulations and your practices evolve, review and update your saved schedules. Mark outdated schedules clearly if you need to keep them for historical reasons.
Document Special Requirements
Use the schedule description field to explain when and why to use specific schedules. This helps colleagues choose the appropriate template.
Test Before Sharing
Before exporting a schedule to share with your team, use it on a real EICR to verify it works as expected. This avoids confusion and corrections later.
Integration with Other Pirform Features
Custom schedules work seamlessly with other Pirform features:
With Intelligence
Pirform’s intelligence system automatically creates observations for custom schedule items just like standard ones. If you code a custom item as C1, Pirform adds the associated observation.
With Photos
You can attach photos to observations created from custom schedule items. Everything works the same way whether using standard or custom schedules.
With Templates
Company-wide schedules can be distributed through template certificates. Create a template with the appropriate custom schedule, and all new certificates from that template inherit it.
Frequently Asked Questions
Can I modify the standard BS 7671 schedule?
Yes. Select the standard schedule, make your changes, and save it with a new name. The original standard schedule remains available unchanged.
Will custom schedules work on other computers?
Yes, if you export the schedule to a file and import it on the other computer. Schedules saved to your library are stored locally in Pirform’s database.
Can I have multiple custom schedules?
Absolutely. Create as many as you need. Many engineers maintain 5-10 schedules for different inspection scenarios.
Do custom items appear in the PDF?
Yes. Custom schedule items print exactly like standard items in the certificate PDF. Clients won’t know the difference.
What happens to observations if I delete a schedule item?
If the item is coded (C1, C2, C3, FI, LIM), the associated observation or limitation is also removed when you delete the item.
Can I revert to the standard schedule?
Yes. Simply use the Schedule Manager to replace your current schedule with any built-in schedule. Your customisations aren’t applied until you save changes to the certificate.
Learn More
Want to explore related features?
- Complete Schedule Manager Documentation - Technical reference with full feature details
- Working with the Inspection Schedule - Day-to-day schedule usage
- Observations and Limitations - Managing EICR findings
- Certificate Options - Controlling what appears in PDFs
Questions About Custom Schedules?
Need help creating the perfect inspection schedule template? Our support team can provide guidance on schedule organisation and best practices for your specific inspection scenarios.
Contact us at support@shineforms.co.uk or explore our complete documentation at docs.shineforms.co.uk.